
Few upgrades change the character of a room as much as well-made built-in bookshelves. Flanking a fireplace, framing a window or lining a home office wall, they add storage, give the room architecture it did not have and make even a plain house feel considered. They are also a good autumn project: the work happens entirely indoors, and a family room with new shelving is ready for the months when everyone spends more time inside.
The difference between built-ins that look custom and ones that look like flat-pack furniture pushed against a wall comes down to details most people never think about until something sags, gaps or wobbles. This guide covers the design decisions, how shelves are sized so they do not bow, materials, anchoring, lighting and wiring, fitting to uneven walls and floors, and how paint-grade and stain-grade work differ in cost and result.
Designing Built In Bookshelves For The Room
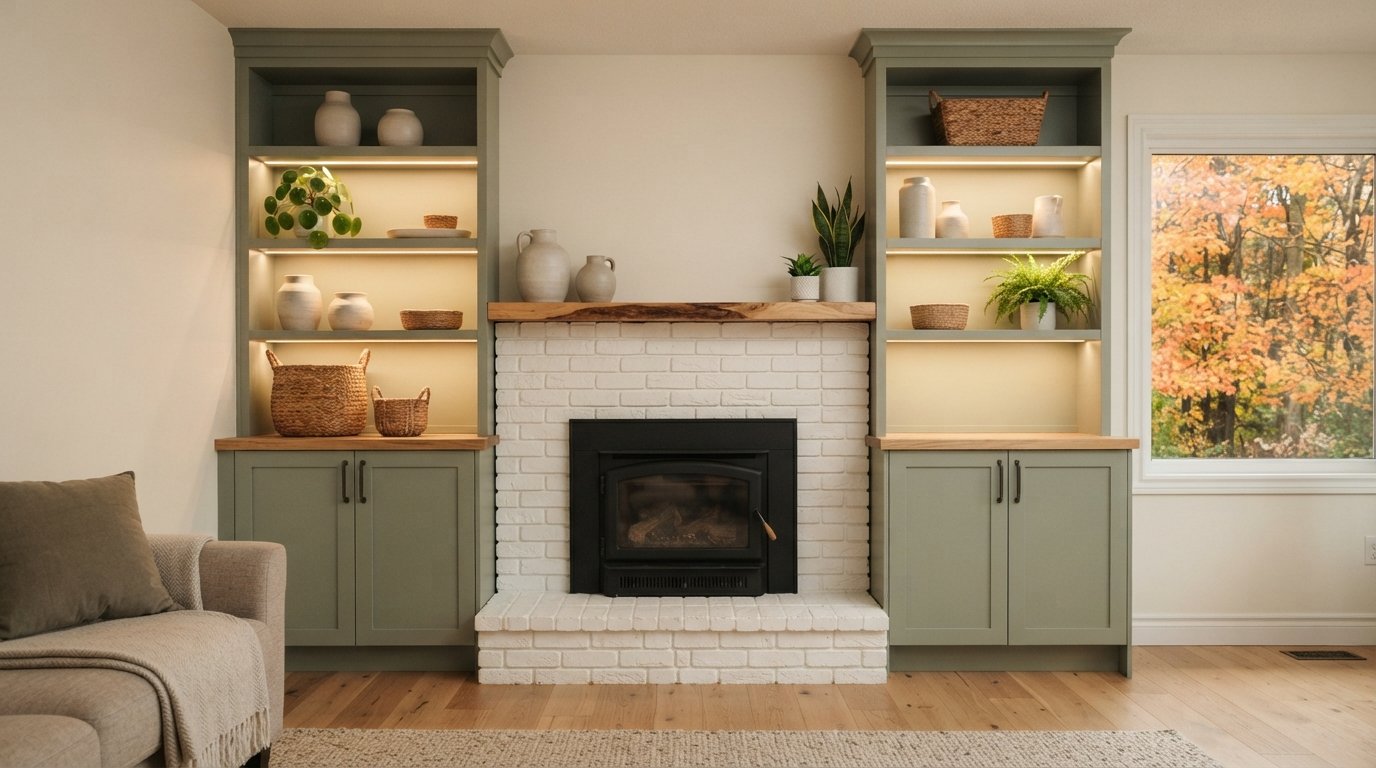
Start with the room, not the shelves. Good built-in bookshelves are designed around the architecture that is already there. Where built-ins go, how tall they are and how they meet the ceiling, windows and trim determine whether they look like part of the house.
Beside a fireplace
The alcoves on either side of a chimney breast are the most natural location. The usual arrangement is closed cabinets at the bottom, roughly counter height, with open shelves above. The lower cabinets hide games, cables and clutter, and their top gives a surface for lamps and display. Symmetry matters here: both sides should match in width and shelf spacing even if the alcoves differ slightly, which usually means adjusting fillers rather than the units.
Fireplaces bring a safety question. Wood cabinets, shelves and trim have to respect the clearances to combustible materials that the fireplace or insert manufacturer and the applicable code specify, both beside the opening and above it. With a gas insert or a modern unit, the installation manual lists these clearances; with an older masonry fireplace, ask your contractor to confirm what applies. Do not let shelf design override them.
Around windows
Built-ins that frame a window, sometimes with a window seat between them, make a reading nook out of a wall that was otherwise hard to furnish. The shelves need to clear the window casing and not block operation of the sash or blinds. If there is a heating register or baseboard heater under the window, the seat must be designed to let heat through, with a grille in the seat face or kick, and never enclose an electric baseboard heater.
In a home office
Office built-ins combine shelves with a desk, file drawers and cable management. Plan the desk height and depth for the actual monitor and chair, allow for cables to pass through the back or the desk top, and put outlets where the equipment will be. Deep lower cabinets hold a printer and files; shelves above hold books and binders.
Proportion is the other part of design. Shelf spacing that gets slightly closer toward the top, a taller bottom shelf for large books and a crown that ties into the room’s existing trim all make the unit look deliberate. If you want built-ins coordinated with paint, lighting and furniture, our design solutions for custom interior millwork can bring the pieces together before anything is built.
Doors, glass and open shelving
Deciding how much of the unit is open and how much is closed shapes both the look and the upkeep. Open shelves show off books and objects but collect dust and demand some styling discipline. Solid doors on the lower section hide the practical clutter every household has. Glass doors on upper sections protect collections from dust while keeping them visible, though they add cost and need careful hinge and latch choices. For built-in bookshelves that will hold a TV, plan a bay sized to the screen with ventilation for any equipment below and a route for cables inside the case. Hardware matters more than people expect: concealed soft-close hinges suit modern doors, while exposed butt hinges and period knobs suit traditional face-frame work. Choose it early, because hinge type affects how the doors and face frames are built.
Shelf Spans And Sag: Sizing Shelves So They Stay Flat
Books are heavy, and sag is the most common complaint about built-in bookshelves. A shelf full of hardcovers carries a lot of weight, and over months a long, thin shelf slowly bows. Once it sags, it rarely comes back. Sag depends on four things: the span between supports, the material, the thickness and whether the front edge is stiffened.
| Shelf construction | Span that usually works for books | Notes |
|---|---|---|
| 3/4 inch MDF, no edge stiffener | About 24 inches or less | MDF is heavy and flexible; prone to long-term sag |
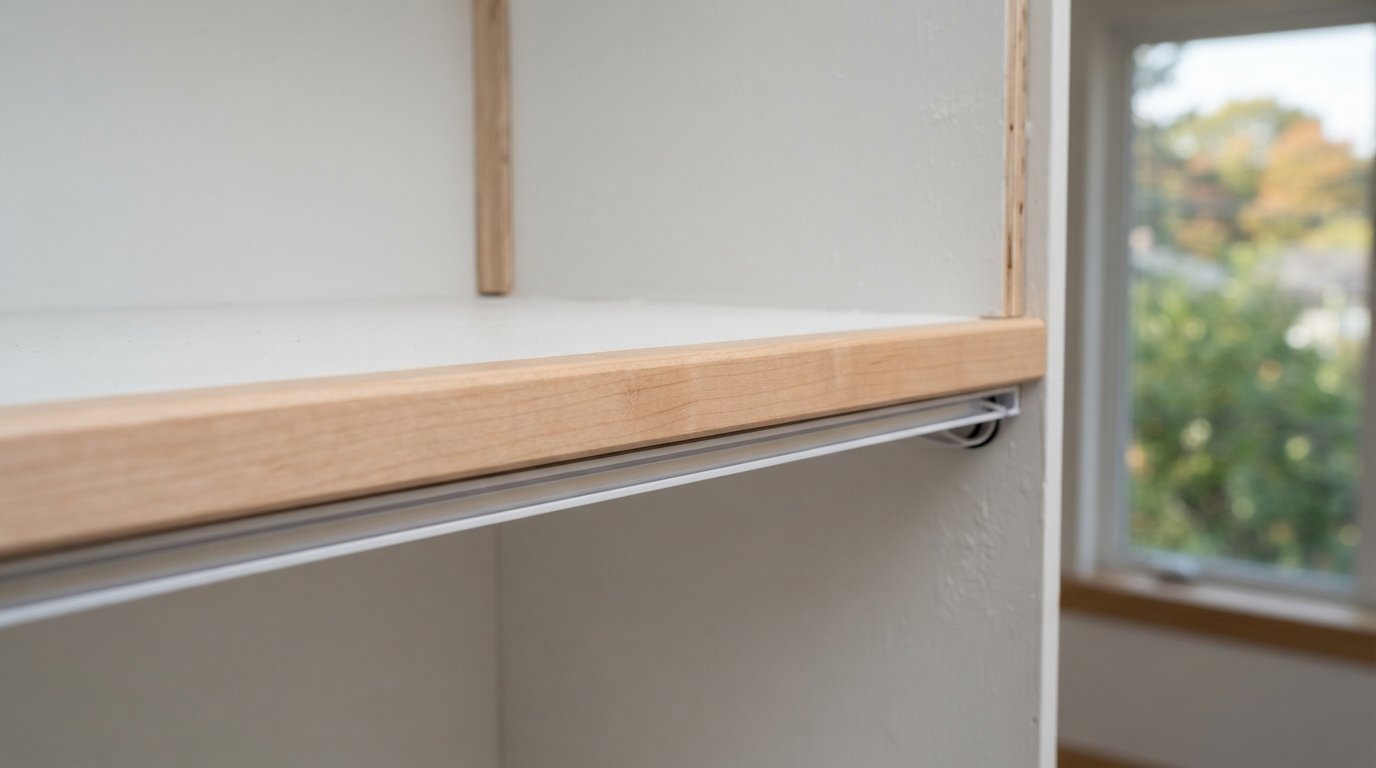
| 3/4 inch MDF with a solid wood front edge | About 28 to 30 inches | The wood edge adds meaningful stiffness |
| 3/4 inch hardwood plywood with a solid wood front edge | About 30 to 36 inches | Common choice for quality built-ins |
| Built-up shelf (1 1/2 inch thick, torsion box or doubled) | About 36 to 48 inches | Chunky look; stiffest option for long spans |
| Fixed shelf screwed or dadoed into the sides and back | Longer than an equivalent adjustable shelf | Attachment along the back edge adds support |
These spans are general guidance for fully loaded book shelves; lighter display items allow longer spans. The simplest way to avoid sag is to keep bays narrow, typically 30 to 36 inches wide, and use plywood with a solid wood front edge. If a design needs a wide bay, add a thicker shelf, a fixed shelf halfway up, or a cleat along the back wall.
Adjustable shelves on pins are convenient, but they carry load only at four points. Fixing one shelf in each bay, usually at the middle, stiffens the whole case and the adjacent shelves.
Plywood Vs MDF And Other Materials
Most custom built-in bookshelves use a combination of materials, each where it performs best.
| Material | Where it is used | Strengths | Limitations |
|---|---|---|---|
| Hardwood plywood (birch, maple, oak veneer) | Cases, shelves, stain-grade work | Strong, stiff, holds screws well, lighter than MDF | Edges need banding; veneer can show defects under paint |
| MDF | Painted doors, panels, trim, some shelves | Very smooth paint finish, stable, affordable | Heavy, sags over long spans, swells if wet, weaker screw holding at edges |
| Paint-grade hardwood (poplar, maple) | Face frames, edge banding, mouldings | Durable edges, crisp details, takes paint well | Higher cost than MDF |
| Stain-grade hardwood (oak, walnut, cherry) | Face frames, solid shelves, visible parts in stained work | Rich grain, can be refinished | Most expensive; grain matching adds time |
| Melamine or pre-finished panels | Cabinet interiors | Easy to clean, no finishing needed | Visible edges need banding; less refined look on open shelves |
A typical quality paint-grade built-in might use plywood cases and shelves, a poplar or maple face frame, and MDF door panels. That combination gives stiff shelves, durable edges and a smooth painted surface.
Anchoring And Structure
Tall, heavy shelving must be fastened to the building. A full-height unit loaded with books can tip if a child climbs it or if it was set on an uneven floor. Good practice includes:
- Fastening to studs through a solid rail at the back of each case, not just into drywall.
- A level base: most built-ins sit on a separate levelled platform or toe-kick frame, shimmed to level, so the cases above are square and doors hang correctly.
- Connecting cases together so the whole run acts as one piece.
- Checking for hidden services before drilling: plumbing, wiring and ducts in the wall.
- Blocking behind drywall in new construction or where walls are open, so fasteners can go exactly where needed.
On exterior walls, remember that shelving over insulated walls can trap cold air behind books. Leaving a small air gap at the back or venting at the top and bottom helps prevent condensation in older, less insulated homes.
Height also affects everyday use. Shelves above about seven feet are hard to reach without a step stool, so reserve the top of floor-to-ceiling built-in bookshelves for items you rarely need, or plan a rolling library ladder on a rail, which needs its own blocking and a clear floor path.
Scribing To Uneven Walls, Floors And Ceilings
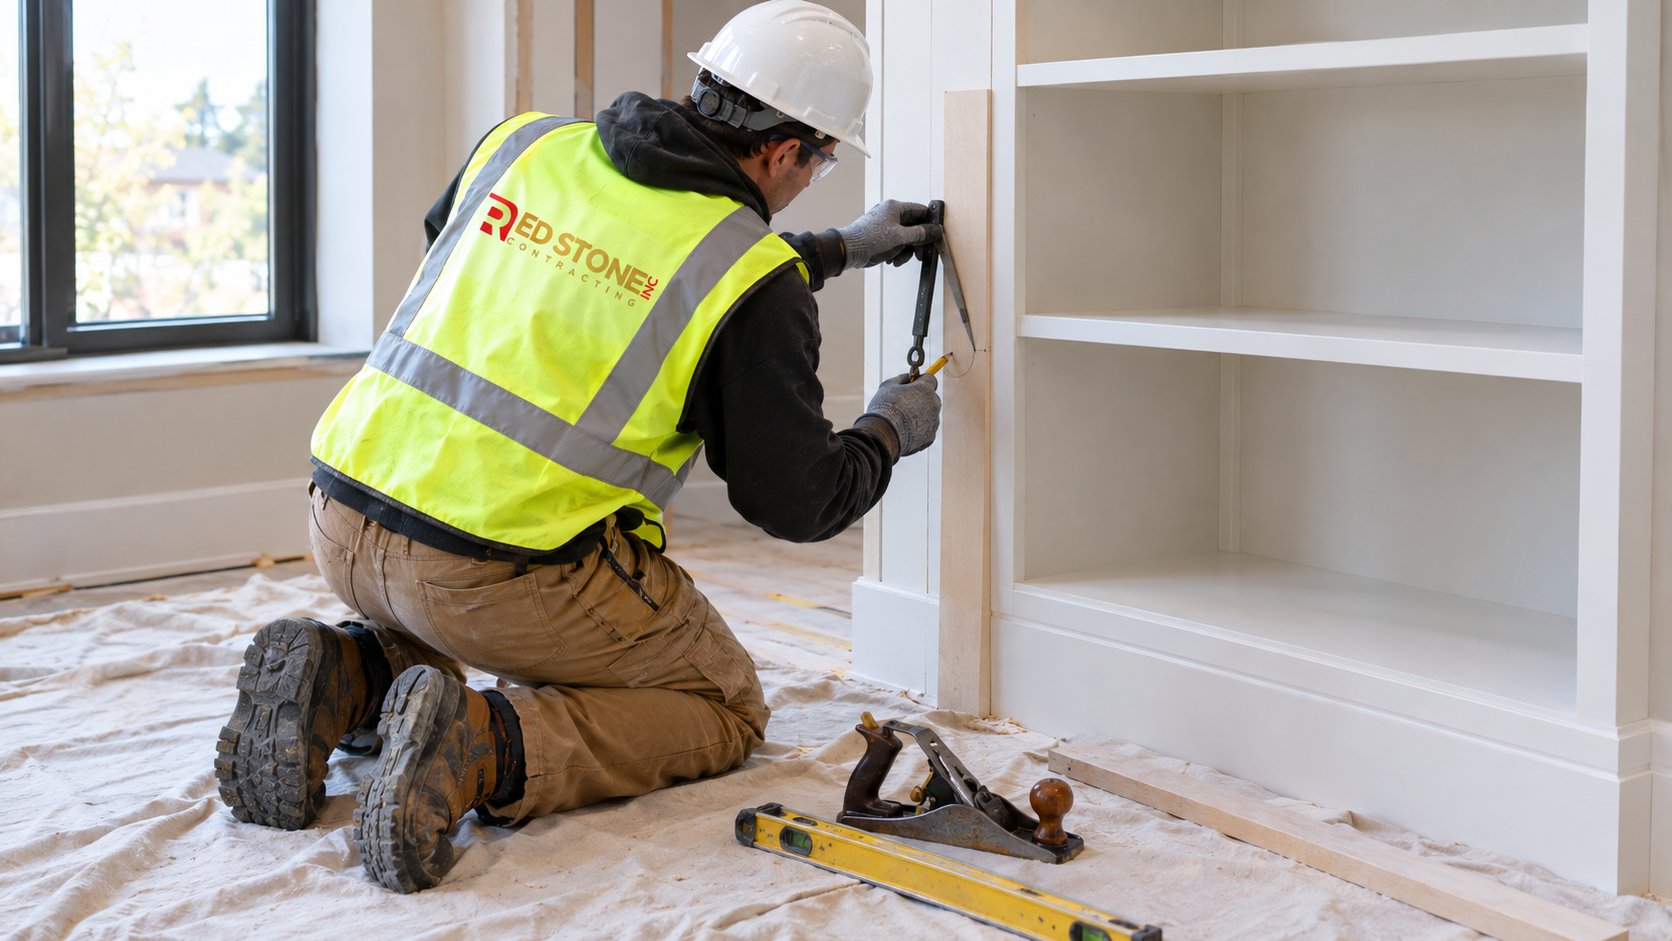
Walls are rarely straight, floors are rarely level and ceilings are rarely flat, especially in older homes. Built-ins made in a shop to perfect dimensions will leave tapered gaps unless they are fitted on site. Scribing is how finish carpenters close those gaps.
How scribing works
The cases are built slightly narrower than the opening, with extra-wide face frame stiles or separate filler strips at the ends. Once the cases are set level and plumb, the carpenter holds the filler against the wall, marks the wall’s profile onto it with a compass or scribing tool, then cuts and planes to that line. The filler then fits the wall exactly. The same applies at the ceiling, where a scribe moulding or crown covers variations, and at the floor, where the baseboard or toe kick is scribed to the floor.
Tying into existing trim
Built-ins look built-in when they share the room’s trim. The baseboard should run continuously along the bottom of the units, matching the existing profile, and the crown or a cap moulding should either match the room’s crown or tie into it. Where the room has no crown, a simple cap at the top of the units, scribed to the ceiling, avoids a dust-collecting gap.
Scribing adds time, and it is one of the reasons custom built-in bookshelves cost more than ready-made units. It is also one of the main reasons they look better.
Integrated Lighting And Wiring
Lighting transforms shelves from storage into a feature. Options include:
- LED strips in routed channels under each shelf or in the face frame, with diffusers for even light.
- Vertical LED strips in the sides of each bay, which light all shelves without a strip on each one.
- Small puck lights at the top of each bay for a more traditional look.
- Picture lights above art in a central bay.
Low-voltage LED lighting needs a driver (power supply) that stays accessible for replacement, often inside a lower cabinet. Wiring should be concealed in channels and routed before the finish is applied. Dimmers suited to the LED drivers allow the lighting to be subtle in the evening.
Built-ins are also a good place to add outlets for lamps, speakers, a TV or charging. New receptacles, switches and circuits should be installed by a licensed electrical contractor, with an ESA permit where required, and fixtures should be suitable for the application. Plan these before the units are built so holes and channels are made in the shop rather than cut on site.
Paint-Grade Vs Stain-Grade Finishes
This decision affects material choice, construction and cost.
Paint-grade
Most built-ins today are paint grade. Materials can be mixed, since paint hides the difference between MDF, poplar and plywood. Joints are filled and caulked before painting, which hides small imperfections. A sprayed finish with a durable cabinet-grade paint gives the smoothest result; on-site brushing and rolling is possible but shows more texture. Painted shelves need time to cure fully before books go on, otherwise books can stick to the paint.
Stain-grade
Stain-grade work uses matching hardwood veneer plywood and solid wood, and every visible surface must be clean and well matched because there is no filler or caulk to hide joints. Grain should flow across doors and panels. It usually costs more in material and labour, and it demands more skilled work. The reward is warmth and depth that paint cannot give, and a finish that can be repaired and refinished rather than repainted.
What Goes Wrong And Why
When we are asked to repair or replace existing built-in bookshelves, the problems usually trace back to a small number of shortcuts. Knowing them helps you judge a quote and a finished job.
| Problem | Likely cause | How it is prevented |
|---|---|---|
| Shelves bowing in the middle | Spans too wide for the material; MDF with no edge stiffener | Narrower bays, plywood with solid wood edges, a fixed shelf per bay |
| Tapered gaps against the wall or ceiling | Units installed without scribing | Scribe fillers and mouldings to the actual wall and ceiling profile |
| Doors that will not stay aligned | Cases racked on an unlevel floor | Levelled base or toe-kick platform; cases shimmed before fastening |
| Books sticking to painted shelves | Paint not fully cured before loading | Allow the cure time the coating manufacturer specifies |
| Cracks at painted joints | Seasonal wood movement with rigid filler | Stable materials, flexible caulk at joints, steady indoor humidity |
| Unit rocks or pulls away from the wall | Fastened to drywall only, not studs | Screw through a solid back rail into studs or blocking |
The cracked-joint issue is worth a note for autumn projects. Once the furnace starts, indoor air dries out, and wood parts shrink a little. Joints between solid wood and panels can open slightly over the first heating season. A well-built unit uses construction that allows for this movement, and a touch-up after the first winter is a normal part of painted millwork.
How A Built-In Project Runs
- Site measure and design: the wall is measured, including out-of-plumb and out-of-level readings, and drawings show bays, shelf spacing, doors, lighting and trim.
- Electrical planning: outlet, switch and driver locations are fixed so wiring can be roughed in if walls need opening.
- Shop fabrication: cases, face frames, shelves and doors are built, and paint-grade parts are often primed or finished in the shop.
- Installation: the base is levelled, cases are set, fastened to studs and joined, then face frames, fillers and mouldings are scribed and fitted.
- Finishing: filling, caulking and final coats; stain-grade work gets its topcoat.
- Lighting and hardware: LED strips, drivers, door hardware and shelf pins go in, followed by cleanup.
- Cure and load: shelves are loaded only once the finish has cured.
Units fabricated in a shop and installed over a few days cause far less disruption than building everything in place, which is worth considering if you are living in the house.
Cost Factors And Timing
Custom built-in bookshelves are priced by complexity more than size. As a very rough guide, full-height built-ins often fall somewhere around $800 to $2,000 per linear foot of wall in the GTA, with simpler units below that range and elaborate stain-grade work above it. These are estimates only and vary widely with the following factors:
- Paint-grade versus stain-grade finish
- Number of doors and drawers compared with open shelves
- Integrated lighting, wiring and outlets
- Complex details such as arched tops, glass doors, ladders or window seats
- Scribing to uneven walls and matching existing trim
- Height of the ceiling and access
- Whether painting is done by spraying in the shop or finishing on site
Timing typically includes design and approval, shop fabrication, site installation over a few days and finishing. Allow for paint cure before loading shelves. Our home renovation team across Durham Region and the wider GTA usually schedules built-ins after flooring and before final paint in a larger renovation.
Questions To Ask Before You Commit
- How wide are the bays, and what shelf material and thickness prevent sag?
- Will the shelves be adjustable, fixed or a mix?
- How will the units be anchored to the wall?
- How will you fit them to my uneven walls, floor and ceiling?
- Will the baseboard and crown match the rest of the room?
- Where will lighting drivers and outlets go?
- For a fireplace wall, what clearances to combustible materials apply?
- Is the finish sprayed or brushed, and how long before I can load the shelves?
You can see what past clients say about finish carpentry and interior projects on our reviews page.
Frequently Asked Questions
How wide can a bookshelf span before it sags?
Is plywood or MDF better for shelving?
Can shelving go beside a fireplace?
How are built-ins attached to the wall?
Should built-ins be painted or stained?
Can lighting be added to shelves?
Planning Built In Bookshelves That Last
Built-ins that look great for decades come from narrow bays, stiff shelves, solid anchoring, careful scribing and a finish suited to how the room is used. Red Stone Contracting designs and installs custom built-ins as part of interior renovations, coordinated with trim, lighting and paint.
Call us today at (905) 901-1006 or request a free estimate.
Serving homeowners in Durham Region and across the wider GTA.